Tuesday, 9 July 2013

Setup The Timezone


HowTo: Linux Server Change OR Setup The Timezone

by  on AUGUST 27, 2006 · 55 COMMENTS· LAST UPDATED NOVEMBER 5, 2012
My Linux systems timezone is pointing to the wrong timezone. How do I setup or change the timezone under Linux operating systems?

Unix time, or POSIX time, is a system for describing points in time: it is the number of seconds elapsed since midnight UTC on the morning of January 1, 1970, not counting leap seconds. The definition for time zones can be written in short form as UTC±n (or GMT±n), where n is the offset in hours. You can use the following commands:

[a] setup or redhat-config-date for RHEL based distros.
[b] dpkg-reconfigure tzdata for Debian based distros.
[c] ln command - Generic method for all other distros.

Command to change the Linux timezone

You need to type the following commands as per your Linux distribution.

If you are using Fedora / RHEL / Cent OS Linux

Type the redhat-config-date command at the command line to start the time and date properties tool, run:
# redhat-config-date
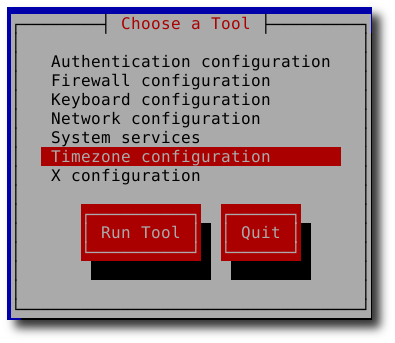
OR type setup and select time zone configuration. This tool is recommended for remote ssh text based sessions.
# setup
Select timezone configuration
Fig.01: Redhat / CentOS Server Setting Up Timezone

Just follow on screen instructions to change the timezone.

If you are using Debian / Ubuntu Linux

To change the timezone for you run the following command as root user:
# dpkg-reconfigure tzdata
Again, just follow on screen instructions.

Set timezone using /etc/localtime configuration file [any Linux distro]

Often /etc/localtime is a symlink to the file localtime or to the correct time zone file in the system time zone directory.

Generic procedure to change timezone under Linux

Cd to /etc, run:
# cd /etc
Create a symlink to file localtime:
# ln -sf /usr/share/zoneinfo/EST localtime
OR some distro use /usr/share/zoneinfo/dirname/zonefile format (Red hat and friends):
# ln -sf /usr/share/zoneinfo/EST localtime
OR if you want to set up it to IST (Asia/Calcutta):
# ln -sf /usr/share/zoneinfo/Asia/Calcutta localtime
Please note that in above example you need to use directory structure i.e. if you want to set the timezone to Calcutta (India) which is located in the Asia directory.

How do I verify new settings?

Use the date command to verify that your timezone is changed:
$ date
Output:
Tue Aug 27 14:46:08 EST 2006

How do I use of environment variable called TZ?

You can use TZ environment variable to display date and time according to your timezone:
$ export TZ=America/Los_Angeles
$ date

Sample Output:
Thu Aug 27 11:10:08 PST 2006

Cluster configuration


Red Hat Cluster allows you to connect a group of computers (called nodes or members) to work together as a cluster. It provides a wide variety of ways to configure hardware and software to suit your clustering needs (for example, a cluster for sharing files on a GFS file system or a cluster with high-availability service failover). This book provides information about how to use configuration tools to configure your cluster and provides considerations to take into account before deploying a Red Hat Cluster. To ensure that your deployment of Red Hat Cluster fully meets your needs and can be supported, consult with an authorized Red Hat representative before you deploy it.

List of web browsers


List of web browsers


History:-
       This is a table of personal computer web browsers by year of release of major version, in chronological order, with the approximate number of worldwide Internet users in millions. Note that Internet user data is related to the entire market, not the versions released in that year. The increased growth of the Internet in the 1990s and 2000s means that current browsers with small market shares have more total users than the entire market early on. For example, 90% market share in 1997 would be roughly 60 million users, but by the start of 2007 9% market share would equate to over 90 million users.
YearWeb browsersInternet users
(in millions)[1][2][3]
1991WorldWideWeb (Nexus)4
1992ViolaWWWErwiseMidasWWWMacWWW (Samba)7
1993MosaicCello,[4] Lynx 2.0ArenaAMosaic 1.010
1994IBM WebExplorerNetscape NavigatorSlipKnot 1.0MacWebIBrowseAgora (Argo), Minuet20
1995Internet Explorer 1Netscape Navigator 2.0, OmniWebUdiWWW,[5] Internet Explorer 2Grail16-39
1996Arachne 1.0Internet Explorer 3.0, Netscape Navigator 3.0, Opera 2.0,
PowerBrowser 1.5,[6] CyberdogAmaya 0.9,[7] AWebVoyager
36-73
1997Internet Explorer 4.0, Netscape Navigator 4.0, Netscape Communicator 4.0, Opera 3.0,[8] Amaya 1.0[7]70-118
1998iCabMozilla147-184
1999Amaya 2.0,[7] Mozilla M3, Internet Explorer 5.0248-278
2000KonquerorNetscape 6Opera 4,[9] Opera 5,[10] K-Meleon 0.2, Amaya 3.0,[7] Amaya 4.0[7]361-396
2001Internet Explorer 6Galeon 1.0, Opera 6,[11] Amaya 5.0[7]513-499
2002Netscape 7, Mozilla 1.0, Phoenix 0.1, Links 2.0, Amaya 6.0,[7] Amaya 7.0[7]587-659
2003Opera 7,[12] Safari 1.0, Epiphany 1.0, Amaya 8.0[7]719-771
2004Firefox 1.0, Netscape Browser, OmniWeb 5.0817-897
2005Safari 2.0, Netscape Browser 8.0, Opera 8,[13] Epiphany 1.8, Amaya 9.0,[7] AOL Explorer 1.0, Maxthon 1.0, Shiira 1.01018-1022
2006SeaMonkey 1.0, K-Meleon 1.0, Galeon 2.0, Camino 1.0, Firefox 2.0, Avant 11, iCab 3, Opera 9,[14] Internet Explorer 71093-1150
2007Maxthon 2.0, Netscape Navigator 9NetSurf 1.0, Flock 1.0, Safari 3.0, Conkeror1319-1364
2008Konqueror 4, Safari 3.1, Opera 9.5,[15] Firefox 3, Amaya 10.0,[7] Flock 2, Chrome 1, Amaya 11.0[7]1574-1556
2009Internet Explorer 8, Chrome 2-3, Safari 4, Opera 10,[16] SeaMonkey 2, Camino 2, Firefox 3.51802-1743
2010K-Meleon 1.5.4, Firefox 3.6, Chrome 4-8, Opera 10.50,[17] Safari 5, xxxterm, Opera 111971-2012
2011Chrome 9-16, Firefox 4-9, Internet Explorer 9, Maxthon 3.0, SeaMonkey 2.1-2.3, Opera 11.50, Safari 5.12,267-2264
2012Chrome 17-23, Firefox 10-17, Internet Explorer 10Opera 12, Safari 62,405


Saturday, 6 July 2013

A Comparison of Network Models

A Comparison of Network Models

There are two network models that describe how networks 'work'. The OSI Model, the older model, was designed for the OSI protocol stack. While different organizations were battling over standards, Vint Cerf and Bob Khan worked out the TCP/IP software from which the TCP/IP Model was co-designed. The diagram below shows how the two networking models compare, and how the logical and physical networking protocols relate to the layers in each of the two models.


There are seven layers in the OSI Model, only four in the TCP/IP model. This is because TCP/IP assumes that applications will take care of everything beyond the Transport layer. The TCP/IP model also squashes the OSI's Physical and Data Link layers together into the Network Access Layer. Internet Protocol really doesn't (and shouldn't) care about the hardware underneath, so long as the computer can run the network device and send IP packets over the connection

CLOUD COMPUTING


Cloud computing allows people to connect to their important information anywhere and at any time. This capability is influencing our future technology. We no longer need to carry around portable mass storage devices or expensive, high capacity flash drives. The “office” is becoming any place where one can connect to the Internet. Technology is moving in a direction that relies on cloud computing to deliver its promises.

Friday, 5 July 2013

Basic Linux Commands

Basic Linux Commands

Modes of Operation


The linux operating system used for the PARTICLE DAQ system can be used either in a terminal mode where you type commands or in a Windows Explorer style graphical user interface (GUI).

The Explorer-like GUI can be used for file manipulation functions (e.g., copying a file to a floppy) or deleting or moving files on the disk.  It cannot be used to run the PARTICLE DAQ itself.

To begin using the Explorer-like GUI, double click on the icons on the Desktop.  For the most part, Explorer mode will be familiar from Windows or MAC OS, so with a few exceptions, this information will not focus on this.  Where something is much more easily done from Explorer mode, it will be highlighted here.

To begin working in the terminal mode, you will need to open a terminal.  This can be accomplished by clicking on the terminal icon in the bottom icon bar, by using the main menu (footprint icon in lower left of bottom icon bar) System Tools -> New Terminal. 

The Manual (terminal mode)


man                                This command brings up the online Unix
manual. Use it on each of the commands below.

For Example:   
man pwd                        You will see the manual for the pwd command.


Accessing files in Folders (Directories) in terminal mode


pwd                                Shows what directory (folder) you are in.
In Linux, your home directory is /home/particle

·       Let's suppose you have several data files (data1, data2 ... etc.) in a directory called muondata.
·       Then suppose the directory muondata is an entry in your main home directory, /home/particle .
·       If you are in your home directory (where terminals start) and type pwd, you will see /home/particle.
·       If you were in the muondata directory, pwd would give you /home/particle/muondata instead    
·       The last slash after a directory name is optional.

As you can see, each slash (/) indicates another sub-directory.
cd                                  Changes directories.

Examples of relative movement among directories:
cd muondata                Moves down from your current directory
into the muondata sub-directory


cd ..                            Moves up one directory (yes, include the
two little dots) 

You can also move directly into directories
cd /home/particle/muondata
                   Moves from ANY directory into the muondata
sub-directory of your home directory.

cd ~               Takes you back to your home directory
(/home/particle)

Making or Removing a Directory (terminal mode)


mkdir dirName            Creates a directory with name dirName.

For Example:
mkdir temp             Creates the directory temp.


rmdir dirName      Removes a directory dirName.

For Example:
rmdir temp                  Removes the directory temp.


Looking at or Finding your Files (terminal mode)


ls                                  Lists files.

If you add -al after ls it will give more details for each file. Such as, size, permissions, owners, dates etc.

ls al                          You'll see a huge list of files that you can't see with the 'ls' command alone and lots of details.

If you see such a long list of files that they scroll off the terminal screen, one way to solve the problem is to use:

ls -al |more       Shows one screen of file names at a time.

less data1         Dumps the contents of the data1 file to your screen with a pause at each line so you don't miss any contents as they scroll. You may move through the file using page up, page down, home and end keys.  When done with less you use the q key to get back to the main terminal.

whereis data1      Shows you the location of the data1 file.


Altering your Files


rm data1                      Deletes the file data1 in the current directory. 

rm -i muon*                Removes all of your muon data files
(careful!!  rm * will remove ALL your files) 
The "-i" makes the computer prompt before removing each file.  If you really want to work without a net, omit the "-i".

cp data1 newdata/    will copy the file data1 to the directory newdata (assuming it has already been created)

mv data1 newdata/    moves the file data1 to the folder newdata and deletes the old one.


Using the Floppy Disk Drive in Linux


The simplest way to access the floppy drive under Linux is to use the Explorer-like interface.  However, there is a very important detail!  To access the files on the disk, you have to mount the floppy disk, which means that the operating system will scan the disk so that it can recognize the files on it. Although your computer will be perfectly happy to allow you to remove the disk by pushing the eject key on the laptop floppy drive, this may result in unexpected actions unless you unmount the disk.  For example, your files may be only partly there or not there at all!  (This is no different then under Windows or DOS; its just that those operating systems hide that detail from you a little better.  This is why, for example, you must eject floppy disks from the disk properties menu in Windows.)

In the Explorer interface, to mount the floppy, you just double click on the desktop icon.  This will bring up a window with the contents of the floppy, and you may drag and drop files there, or take any other actions you would with normal files.   (Note: unlike in Windows and MacOS, when you drag a file from your home area to the floppy, it moves the file instead of making a copy.)

To remove the disk, you must first right-click on the desktop icon, and select Unmount volume or Eject (either does the same thing).  When this is complete (and it may take a long time since it may have to complete writing files to the floppy!), you may push the eject button on the floppy to remove it.

Things are more complicated by possible in the terminal mode:

mount              Mounts a drive to the operating system.
Linux does not 'see' the floppy drive until
you tell it to.

For Example:
mount /mnt/floppy    Allows you to use the floppy drive which has directory name /mnt/floppy


cp aFile /mnt/floppy/     Copies the file aFile to the floppy disk.

ls /mnt/qfloppy/          Allows you to see what files are on your floppy.

You may run into problems moving large files onto a 1.44MB floppy disk.  One option to fit larger files is to create a zip archive containing the file onto the floppy.  For Example:

zip /mnt/floppy/myFile.zip muon.myDataRun 
                   Moves the file muon.myDataRun into a zip file on the floppy named myFile.zip

After you are done and before you eject it (this is very, very important), you must unmount the floppy.

umount /mnt/qfloppy     Allows you to remove the floppy disk

·       Make sure you wait for the command prompt to reappear (this might take a few seconds) before ejecting the floppy. 
·       If you eject the floppy before you unmount the floppy, it may corrupt the data on the floppy and cause the system to be confused if you try to use the floppy again. 
·       If you make a mistake like this, it's probably best to reboot.  Sorry.

df                                  Shows the disk usage. This will tell you how much disk space you have left on your hard drive as well as the floppy.



Wednesday, 3 July 2013

STEGANOGRAPHY

                                                              STEGANOGRAPHY


There are a large number of steganographic methods that most of us are familiar with (especially if you watch a lot of spy movies!), ranging from invisible ink and microdots to secreting a hidden message in the second letter of each word of a large body of text and spread spectrum radio communication. With computers and networks, there are many other ways of hiding information, such as:


  • Covert channels (e.g., Loki and some distributed denial-of-service tools use the Internet Control Message Protocol, or ICMP, as the communications channel between the "bad guy" and a compromised system)
  • Hidden text within Web pages
  • Hiding files in "plain sight" (e.g., what better place to "hide" a file than with an important sounding name in the c:\winnt\system32 directory?)
  • Null ciphers (e.g., using the first letter of each word to form a hidden message in an otherwise innocuous text)
Steganography today, however, is significantly more sophisticated than the examples above suggest, allowing a user to hide large amounts of information within image and audio files. These forms of steganography often are used in conjunction with cryptography so that the information is doubly protected; first it is encrypted and then hidden so that an adversary has to first find the information (an often difficult task in and of itself) and then decrypt it.
There are a number of uses for steganography besides the mere novelty. One of the most widely used applications is for so-called digital watermarking. A watermark, historically, is the replication of an image, logo, or text on paper stock so that the source of the document can be at least partially authenticated. A digital watermark can accomplish the same function; a graphic artist, for example, might post sample images on her Web site complete with an embedded signature so that she can later prove her ownership in case others attempt to portray her work as their own.
Stego can also be used to allow communication within an underground community. There are several reports, for example, of persecuted religious minorities using steganography to embed messages for the group within images that are posted to known Web sites.


STEGANOGRAPHIC METHODS
The following formula provides a very generic description of the pieces of the steganographic process:
cover_medium + hidden_data + stego_key = stego_medium
In this context, the cover_medium is the file in which we will hide the hidden_data, which may also be encrypted using the stego_key. The resultant file is the stego_medium (which will, of course. be the same type of file as the cover_medium). The cover_medium (and, thus, the stego_medium) are typically image or audio files. In this article, I will focus on image files and will, therefore, refer to thecover_image and stego_image.
 

Copyright (c) 2010 NETWORK PLANET. Design by WpThemesExpert
Blogger Template by New Blogger Templates.